How to connect OpenAI Apps SDK to MCP
This quickstart walks you through building the simplest possible ChatGPT App that renders a custom widget.
We’ll build a “Hello World” app that demonstrates the core concepts of the OpenAI Apps SDK and how to host it using Gram. This includes:
- A Gram MCP server with a single tool: This is the foundation for exposing functionality to ChatGPT.
- A widget resource: This is custom HTML that ChatGPT can render inline in conversations.
_metaannotations: This is metadata that links tools to widgets and that controls rendering behavior.
Prerequisites
To follow this guide, you need the following installed on your machine:
- Node 22.18 or later
- The Gram CLI
- pnpm
If you don’t have pnpm, install it with the following command:
npm install -g pnpmDeveloper mode availability
Developer mode requires a paid ChatGPT subscription. See the OpenAI developer mode guide for the latest availability details.
Enable ChatGPT developer mode
Custom connectors require developer mode in ChatGPT.
- Open ChatGPT .
- Navigate to Settings → Apps → Advanced Settings.
- Toggle Developer mode on.
Clone the example
Clone the repository and navigate to the hello-world-gram example:
git clone https://github.com/speakeasy-api/openai-apps-sdk-examples.git
cd openai-apps-sdk-examples/hello-world-gram
pnpm install
Understand the MCP server code
The majority of the app is contained in src/mcp-server.ts. Open the file to see the key components.
The widget HTML
The widget is a simple HTML page with inline styles. The full markup lives in src/mcp-server.ts:
const WIDGET_HTML = `<!DOCTYPE html>
<html>
<head>
  <style>
    .hello-widget {
      font-family: system-ui, sans-serif;
      padding: 24px;
      border-radius: 12px;
      background: linear-gradient(135deg, #667eea 0%, #764ba2 100%);
      color: white;
      text-align: center;
    }
    .hello-widget h1 { margin: 0 0 8px 0; font-size: 28px; }
    .hello-widget p { margin: 0; opacity: 0.9; }
  </style>
</head>
<body>
  <div class="hello-widget">
    <h1>Hello, World!</h1>
    <p>This widget is rendered by the OpenAI Apps SDK</p>
  </div>
</body>
</html>`;
The OpenAI metadata
The _meta object tells ChatGPT how to handle the tool and render the widget:
const widgetMeta = {
  "openai/outputTemplate": WIDGET_URI,
  "openai/toolInvocation/invoking": "Loading...",
  "openai/toolInvocation/invoked": "Done!",
  "openai/widgetAccessible": "true",
  "openai/resultCanProduceWidget": "true",
} as const;openai/outputTemplate: links the tool to a widget by pointing to the widget’s resource URI. When ChatGPT calls this tool, it fetches and renders the HTML from this URI instead of showing plain text output.openai/toolInvocation/invokingis the status message shown while the tool runs, andinvokedis shown after it completes.openai/widgetAccessibleenables accessibility features for the rendered widget.
The MCP server
The server exposes one tool (hello) and one resource (the widget HTML). The McpServer class provides helper methods to register resources and tools:
registerResourceregisters a resource with its URI, metadata, and a handler that returns the resource content.registerToolregisters a tool with its name, description, input schema, and a handler that executes when the tool is called.
Note that resources require a description field for Gram to discover them.
The mimeType uses text/html+skybridge instead of plain text/html. Skybridge is OpenAI’s internal rendering engine for widgets — it tells ChatGPT to render the HTML as an interactive widget rather than displaying it as raw content.
export function createHelloServer(): McpServer {
  const server = new McpServer(
    { name: "hello-world", version: "0.1.0" },
    { capabilities: { resources: {}, tools: {} } },
  );

  // Register widget resource
  server.registerResource(
    "hello-widget",
    WIDGET_URI,
    {
      description: "Hello Widget markup",
      mimeType: "text/html+skybridge",
      _meta: widgetMeta,
    },
    async () => ({
      contents: [
        {
          uri: WIDGET_URI,
          mimeType: "text/html+skybridge",
          text: WIDGET_HTML,
          _meta: widgetMeta,
        },
      ],
    }),
  );

  // Register hello tool
  server.registerTool(
    "hello",
    {
      description: "Show a hello world widget",
      inputSchema: {},
      _meta: widgetMeta,
    },
    async () => ({
      content: [{ type: "text", text: "Hello, World!" }],
      _meta: widgetMeta,
    }),
  );

  return server;
}
Build and deploy the MCP endpoint
Build the function and deploy to Gram:
pnpm build
gram auth
pnpm push
Both pnpm build and pnpm push use the Gram Functions CLI under the hood (via gram.config.ts).
After the push completes, the Gram dashboard displays the hosted MCP endpoint.
Create a toolset and MCP server
In the Gram dashboard:
- Create a new Toolset and give it a name like
Hello World. - Add the
hellotool from the deployed function. - Add the
ui://widget/hello.htmlresource. - Navigate to MCP, click the toolset, and click Enable.
- Set the visibility to Public.
Copy the MCP endpoint URL under the Hosted URL heading.
Add the connector to ChatGPT
In ChatGPT:
- Navigate to Settings → Apps.
- Click Create app.
- Paste the Gram MCP endpoint URL.
- Select No Auth from the Authentication dropdown.
- Give the connector a name and click Create.
- Refresh the connector after pushing updates.
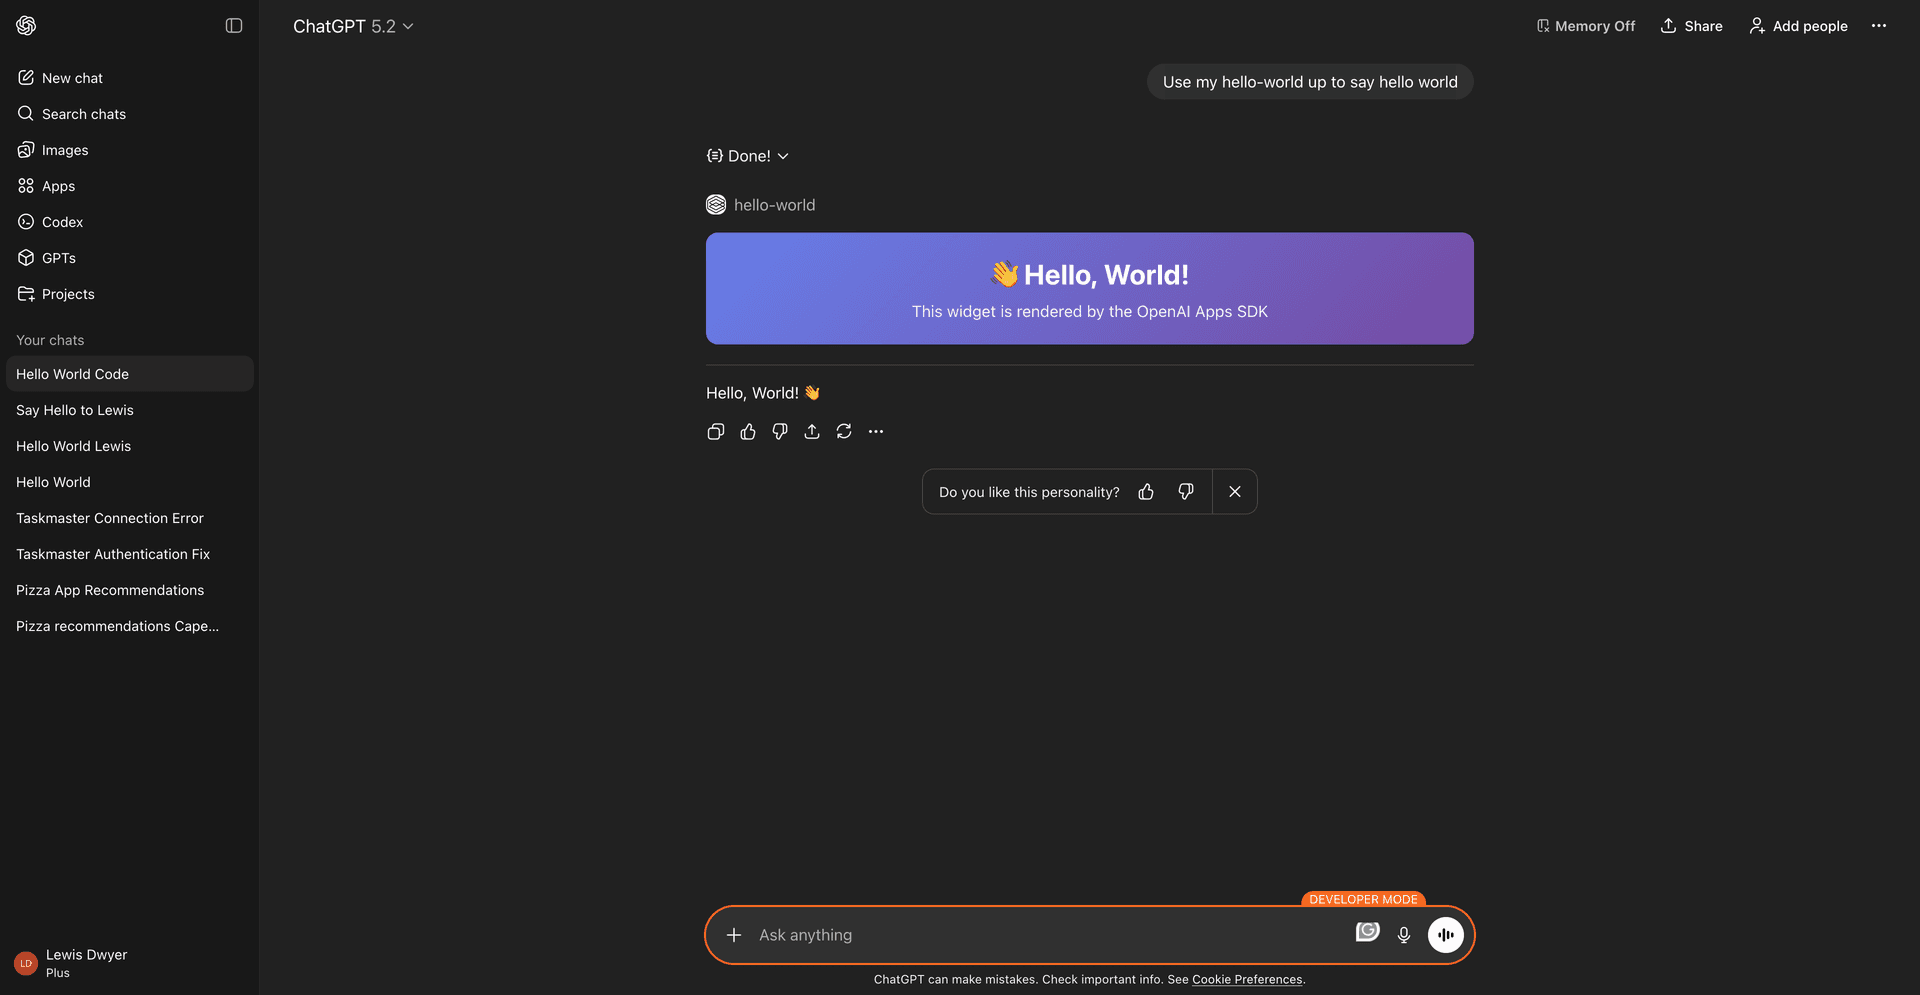
Test the app
Open a new chat in ChatGPT, click the + button, and add the connector. Ask ChatGPT to say hello using your app.
The widget should appear inline in the conversation.
Next steps
This example demonstrates the minimal structure of an OpenAI App. To build more complex apps:
- Add input parameters to tools and pass data to widgets via
structuredContent - Access data in widgets using
window.openai.toolOutput - Build interactive widgets with React or other frameworks
For a more complete example with interactive maps and dynamic data, see Using the OpenAI Apps SDK with Gram Functions.
Last updated on